The TP-Link Smart Outlet and the Kasa App

Schedule Your Appliances with Kasa,
and Control Them with Alexa
This is Part 10 of a series on building a Smart Home and using Alexa to control it. Previous articles covered setting up and using both your Amazon Echo and the companion Alexa app. Again, we recommend you peruse those previous posts if you are interested in learning about all that Alexa can do.
This week, we go back to talking about Smart Outlets. We previously reviewed the WeMo family of Smart Outlets, as well as the Hue Lighting System. Today, we're going to discuss the TP-Link Family of Smart Devices, and specifically, the TP-Link Smart Outlet. The TP-Link Outlet is similar to the WeMo in many ways, but it has a few important differences. Both the WeMo and the TP-Link are worthy entries in the field. Depending on your specific needs, you may find one works better for you than the other.
TP-Link Smart Outlets
The TP-Link Outlet offers all of the above. With a TP-Link Smart Outlet, you can control your appliances with an app, either while at home, or remotely over the Internet. It also offers Alexa compatibility, so you can control these outlets with your voice.
TP-Link offers several flavors of Smart Plugs. Some models offer energy monitoring as well as remote control. One model even integrates a WiFi extender into the mix.
TP-Link Outlet Capabilities
TP-Link Smart Outlets offer all of the functions you'd expect from a Smart Plug. They offer remote access and scheduling through the Kasa App. Of course, you can turn attached devices on an off through the app. But you can also do a lot more. TP-Link Smart Outlets are compatible with Alexa "Scenes." The app has pre-built scenes for "Good Morning," "Good Night," and "Movie Night," and you can create your own custom scenes as well. "Scenes" may contain one or more of your TP-Link Smart Devices. (TP-Link offers Smart Lights and Smart Switches as well.) They're handy for grouping several TP-Link devices together, so you can control them with a single command.

In addition to "Scenes," you can set schedules and timers for each individual outlet. TP-Link provides a built in "Sunrise to Sunset," or "Sunset to Sunrise" option. You can also set "on" and "off" times for each outlet. In addition, you can set an "Away" mode through the Kasa app. With "Away" mode, you set a period you'd like lights to be active, and the app randomly turns them on and off during this period. Scheduling lights just turns them on and off at set times, while Away mode randomizes lighting during a specified interval.
The Kasa app also has a timer function. This can be handy if you have appliances plugged into your Smart Outlet. For example, if you plug a curling iron into a Smart Plug, you can set a timer to have it turn off after 30 minutes. Then, you do not need to worry about forgetting to shut it off. Likewise, you could plug your electric frying pan in, set the timer for an hour, cook breakfast, and leave the house. You KNOW that frying pan shut itself off after an hour, so no worries about a kitchen fire.
Finally, the Kasa app will report on each outlet's "run time." For example, I have a bedside fan on a TP-Link plug. The app tells me I ran that fan for 7.2 hours last night, and 82.3 hours over the last 7 days. It averaged 9.72 hours a day over the last month. If you're curious to see how many hours your teenage daughter spends blow-drying and curling her hair, give her a TP-Link plug for her bathroom. You can not only see how many hours she used it in a week, you can also turn off whatever is plugged in from your smartphone. You can sell her on its benefits when you explain she can turn on the iron for pre-heating right from her bed.
All TP-Link Smart Devices work great with Alexa. Unfortunately, however, they do NOT work with IFTTT (If This Then That.) If you are an IFTTT User, you're better off sticking with a WeMo. And although the Kasa App works with a Smartphone, there is no Fire Tablet app or Web Portal. (I am not sure why TP-Link does NOT release an Amazon-compatible app; users have requested one. In my opinion, EVERY Alexa compatible device should have a companion app available in the Amazon Appstore.) Like most Smart Devices, the TP-Link Smart Plug requires a 2.4 Ghz WiFi connection. Again, most routers have a 2.4 band available. However, if you run a 5 Ghz only network, your TP-Link plug will not connect.
TP-Link Smart Outlet Models
As I said, TP-Link Smart Plugs come in a few different flavors and sizes. All outlets are Alexa compatible and use the Kasa app for additional control. All offer simple on/off functionality. One model adds Energy Monitoring, while another integrates a WiFi Extender.
The HSI-100 Smart Plug

This is the original TP-Link Smart Plug. As such, you can often find it on sale, especially in multi-packs. The HSI-100 is a larger plug. If plugged into the top half of a double outlet, a small profile plug can still fit in the bottom outlet. It has a status light on the front, above the socket, and a reset button on the top.
I own this particular Smart Outlet. I have had zero issues with it. The button placement makes it very easy to reset to factory settings without having to actually unplug the device, and the status light doubles as a manual switch, in case of WiFi outages. Even if placed behind furniture, the HSI-100 is easy to operate "by feel." The status light on the front is unobtrusive enough that it will not interrupt sleep, even if it is not obscured by anything. In addition, it has a decent internal antenna, meaning it keeps its connection, even on an overloaded WiFi network. I really have no complaints whatsoever with the HSI-100. However, as it is an "older model," I would NOT recommend buying it at it's full ~$40 price.
Amazon has been running sales sporadically, with the HSI-100 selling for as low as $20. They have also been running specials on the 2-packs for around $55. (The embedded Amazon links should show the current sales price; if you do not see them, try disabling your ad-blocker.) Also check Internet Discounters and Best Buy for deals on the HSI-100. And believe it or not, Home Depot is always competitive on Smart Devices.
The TP-Link Mini (HS-105)

The TP-Link Mini is the newer version of TP-Link's Smart Outlet. Like its name implies, it is a smaller version of the HS-100. As such, you can fit two Smart Outlets in your typical double plug. At only 2.8 x 1 x 2.2 inches , it is even more compact than the WeMo Mini. This can be a good thing or a bad thing, depending on your perspective.
The Status Light and Reset Button are on the end of the plug. This makes it harder to both see and feel. This button also acts as the "Factory Reset" button, making it easier to inadvertently reset it when you're just trying to cycle power manually. If you accidentally hold it down too long, you'll need to reconfigure your device as if it were new, out of the box.
In a kitchen or bathroom, the smaller size could be a real advantage. Sockets tend to be at a higher level in those rooms, so you will have no problems seeing the status light or operating the manual switch. However, behind furniture and with lower outlets, I personally prefer the HSI-100. Your preferences may differ. However, placement of the manual override switch is a consideration when deciding between a standard and a mini-sized plug. (I actually got angry at the mini behind my headboard when I couldn't reach the manual switch during a late night Internet outage, and I just wanted to go to bed. I ended up using the switch on the lamp, as it was just too hard to reach the switch on the mini itself. But then I had to get out of bed...)
Currently, the TP-Link Mini retails for about $35, or $5 more than the HS-100. However, Amazon usually sells these at around $30 (or the same price as the HSI-100). The street price currently runs about $30, and I've rarely seen these for less.
 This looks exactly like the HSI-100, and it functions similarly. However, this plug adds Energy Monitoring, so you can analyze a device’s real-time and historical power consumption. Energy monitoring is reported through the app and gives data about power consumption, as well as run time for whatever is plugged in. You can also get weekly and monthly power summary reports.
This can be handy if you're trying to figure out how much it costs to run a particular appliance, or if you're trying to track down things that are driving up your power bills. These retail for about $35, or about the same price as a mini. You might want to throw one or two of these into your Smart Home mix, but you probably do not need energy monitoring on EVERY outlet. It can be a fun "toy" for a gadget lover though, and this feature does not drive the outlet's price up significantly.
 This product combines a WiFi Range Extender with a Smart Outlet. Sized at 6.90in. x 4.20in. x 4.00in., the outlet has a flip-up antenna. It also has an Ethernet port on the side, for those devices requiring a wired connection. Range extenders basically set up mini-access points to help extend WiFi to those "dead zones" in your house. This particular outlet can be a good solution when you need to extend Internet coverage, as well as add smart control to a particular device.
These outlets retail for about $90, but generally can be found in the $70 range. If you do not already have a good router, an extender will not magically improve that. However, if you have a good router, but still find yourself with dead zones, a WiFi extender can help. I have no personal experience with this outlet, so I cannot review it. My home is small enough that a good router does the trick. However, I do want to mention its availability for those who find themselves in need of one. If you use WiFi extenders currently, adding one with an integrated Smart Outlet can be a fantastic option.
 The Kasa App is the brains behind TP-Link's family of Smart Devices. You will need the Kasa App to configure your outlets, connect them to WiFi, and program routines. Once you've set up your outlets, you must enable the "Kasa" skill in Alexa's Skill Store. (Say"Alexa, enable TP-Link Kasa," or enable online at http://amzn.to/2w58VUL.) Then, asking Alexa to "Find my devices" integrates them with your Amazon Echo. When you've paired your plug(s) to Alexa, you can control them via device name or scene name. Any scenes you've created with the Kasa app will appear in your "Scenes" list in the Alexa app. (NOTE: You must rerun discovery after editing, updating, or adding a scene or new device through Kasa, every time.)
The Kasa App is available for ios (Apple) or Android, in the respective app store. (If you search for the app, be sure to spell it with a K.) You should download the app before you even open your outlet. Additionally, I recommend opening the app and setting up an account as well. You will need to do this at some point, and I always find it easier to do it at the beginning.


Tap on the Plus (+) Icon in the upper right corner to create a new scheduled event. This will launch the "Create Event" screen.

On this screen, you will see "rolling numbers," an on/off button, and days of the week. Scroll through the numbers to set the time you want this event to trigger. Next, tap the on/off field to set whether this routine turns the outlet on or off. Finally, tap on the days of the week you want this event to trigger.
If you want the event to trigger at Sunrise, rather than a specified time, tap on the left arrow (<) character to the left of the time field.


Tapping on the caret (>) to the right of the time field will take you to the sunset function.

Once your routine is programmed to your liking, tap "Save." You will be brought back to the schedule tab, and you should see your new item listed there.
Follow the same steps to set an "off" time for your device. Note that you need to set up separate events for on and off.
 There are two important steps for controlling these Smart Outlets with Alexa. First, you must enable the Kasa Skill. Next, you must run device discovery.
The easiest way to enable the Kasa Skill is to say "Alexa, enable the TP-Link Kasa" skill. Alexa should respond "Okay, I've enabled the TP-Link Kasa Skill." If she doesn't, you can enable the skill either through the Alexa app, or through the web at http://amzn.to/2wJJ2vP. (To enable through the Alexa app, open the Hamburger Menu and go to "Skills." Type "Kasa" in the Search Box. Select the Kasa Skill and tap "Enable skill.")
To run discovery, say "Alexa, find my devices." You can also run discovery from the Alexa app. Tap the Hamburger Menu, select "Smart Home," then tap "Devices." Scroll to the bottom and tap "Discover." Remember to run Discovery after adding or changing anything in the Kasa app.
Once you've done this, you can begin controlling your Smart Outlets by Device Name, Scene name, or Alexa Group. ("Alexa, turn on/off [device];" "Alexa, turn on/off [scene];" "Alexa, turn on/off [group]." "Alexa, turn [device] off" also works.)
Currently, the TP-Link Mini retails for about $35, or $5 more than the HS-100. However, Amazon usually sells these at around $30 (or the same price as the HSI-100). The street price currently runs about $30, and I've rarely seen these for less.
Smart Plug with Energy Monitoring (HS-110)

This can be handy if you're trying to figure out how much it costs to run a particular appliance, or if you're trying to track down things that are driving up your power bills. These retail for about $35, or about the same price as a mini. You might want to throw one or two of these into your Smart Home mix, but you probably do not need energy monitoring on EVERY outlet. It can be a fun "toy" for a gadget lover though, and this feature does not drive the outlet's price up significantly.
Smart Plug with Range Extender

These outlets retail for about $90, but generally can be found in the $70 range. If you do not already have a good router, an extender will not magically improve that. However, if you have a good router, but still find yourself with dead zones, a WiFi extender can help. I have no personal experience with this outlet, so I cannot review it. My home is small enough that a good router does the trick. However, I do want to mention its availability for those who find themselves in need of one. If you use WiFi extenders currently, adding one with an integrated Smart Outlet can be a fantastic option.
The Kasa App

The Kasa App is available for ios (Apple) or Android, in the respective app store. (If you search for the app, be sure to spell it with a K.) You should download the app before you even open your outlet. Additionally, I recommend opening the app and setting up an account as well. You will need to do this at some point, and I always find it easier to do it at the beginning.
Setting Up your Smart Outlet
Whether you are adding your first Smart Device, or adding additional ones, you will need to follow these steps. Open the Kasa app and log into your account. (If you skipped down to here, see the previous section for Kasa info and download links.) Make sure your mobile device is connected to your home 2.4 GHz WiFi network.
Next, open up the box and plug your outlet into an electrical socket. This does NOT necessarily need to be the socket in which the plug will live; you can move it later, after setting it up.
If the plug set-up routine does NOT start automatically, tap on "My Kasa" to get to the "Devices" Screen.

From the "Devices" tab, click the "Plus" Icon (+) to launch Device Set-up.

Tap on the icon for the appropriate device. (In this example, we'll be setting up an HSI-100 Smart Outlet. If you are setting up a mini, you'll tap that icon instead.

Check the status light on the outlet. It should go from solid yellow to blinking yellow and green. Once it has, click the "Next" button in the app.


Next, you'll need to connect the plug to WiFi. The steps are a little different for Android vs. Apple.
For Android:
Kasa will look for your Smart Plug automatically. This will take about a minute. Once it connects, Kasa will advance to the next screen. (This should be naming your device. Skip past the Apple section, and continue from the naming step.)
For Apple/ios:
Kasa will guide you through connecting your plug manually.

You will need to go into your device's "Settings" section and connect the plug to WiFi. DO NOT connect it to your OWN WiFi at this point; look for a network beginning with "TP-Link," and connect to that. (You are connecting to the OUTLET'S WiFi, rather than the WiFi you'll use to control the outlet at this point.)
Once you've connected the plug to the TP-Link Network, you'll need to return to the Kasa app.

If you've connected correctly, you will advance to the "Naming" screen.
Both Android and Apple users can be confident the set-up is on track once they reach this screen. This is where you'll name your Smart Outlet. This is the word you'll use for the associated Alexa command.

You'll want to pick a name related to the plug's use, if at all possible. My Smart Outlet controls a penguin-shaped bedside fan, so I named my outlet "Penguin." (I did NOT name it "fan" so that name is free to use in a group later.) Remember, you want to give every device, group, and scene a unique name to avoid confusing Alexa. And I like to reserve "Room" names for groups, so I avoid using them with individual devices. (We discussed naming conventions in an earlier article, if you need a refresher.)
You can always edit your device's name later, so don't stress out too much over picking the "right" one from the start.
After you've named your plug, hit next, and you'll be brought to a screen where you can customize the icon. Scroll down for additional choices. Since my plug would ultimately be controlling a fan, I chose the fan icon for my plug.

After choosing your icon, tap "Next." You'll be brought to a screen where you can enable remote control. You'll want to ensure this is switched ON, so you can control your outlet with BOTH the app and Alexa.

Ensure the slider is in the ON position, then tap on "Save Device." You're finally ready to connect to your home network.
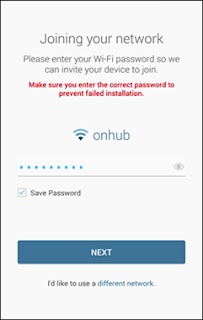
After you've saved the device, Kasa will advance to the "Joining your network" screen. If you do NOT see your network's name, tap on "Use a Different Network" at the bottom of the screen. Kasa will try to "guess" the correct network, which may or may not be yours. Scroll through the list of "Different Networks," and select your own. Kasa will return to the "Joining Your Network" screen, and your network name should now appear. Tap on the "password" field to enter your WiFi Network Password. Then tap "next."

Setup will progress to an "Almost Done" screen while it finishes configuring your device. After 2-3 minutes, the "Finished" screen should appear.

Voila! You're finished! You may now begin using your Smart Outlet. Keep reading to learn how to set up schedules and connect your devices to Alexa.
Next, open up the box and plug your outlet into an electrical socket. This does NOT necessarily need to be the socket in which the plug will live; you can move it later, after setting it up.
If the plug set-up routine does NOT start automatically, tap on "My Kasa" to get to the "Devices" Screen.

From the "Devices" tab, click the "Plus" Icon (+) to launch Device Set-up.

Tap on the icon for the appropriate device. (In this example, we'll be setting up an HSI-100 Smart Outlet. If you are setting up a mini, you'll tap that icon instead.

Check the status light on the outlet. It should go from solid yellow to blinking yellow and green. Once it has, click the "Next" button in the app.


Next, you'll need to connect the plug to WiFi. The steps are a little different for Android vs. Apple.
For Android:
Kasa will look for your Smart Plug automatically. This will take about a minute. Once it connects, Kasa will advance to the next screen. (This should be naming your device. Skip past the Apple section, and continue from the naming step.)
For Apple/ios:
Kasa will guide you through connecting your plug manually.

You will need to go into your device's "Settings" section and connect the plug to WiFi. DO NOT connect it to your OWN WiFi at this point; look for a network beginning with "TP-Link," and connect to that. (You are connecting to the OUTLET'S WiFi, rather than the WiFi you'll use to control the outlet at this point.)
Once you've connected the plug to the TP-Link Network, you'll need to return to the Kasa app.

If you've connected correctly, you will advance to the "Naming" screen.
The "Naming Screen"
Both Android and Apple users can be confident the set-up is on track once they reach this screen. This is where you'll name your Smart Outlet. This is the word you'll use for the associated Alexa command.

You'll want to pick a name related to the plug's use, if at all possible. My Smart Outlet controls a penguin-shaped bedside fan, so I named my outlet "Penguin." (I did NOT name it "fan" so that name is free to use in a group later.) Remember, you want to give every device, group, and scene a unique name to avoid confusing Alexa. And I like to reserve "Room" names for groups, so I avoid using them with individual devices. (We discussed naming conventions in an earlier article, if you need a refresher.)
You can always edit your device's name later, so don't stress out too much over picking the "right" one from the start.
After you've named your plug, hit next, and you'll be brought to a screen where you can customize the icon. Scroll down for additional choices. Since my plug would ultimately be controlling a fan, I chose the fan icon for my plug.

After choosing your icon, tap "Next." You'll be brought to a screen where you can enable remote control. You'll want to ensure this is switched ON, so you can control your outlet with BOTH the app and Alexa.

Ensure the slider is in the ON position, then tap on "Save Device." You're finally ready to connect to your home network.
Connect to YOUR Network

After you've saved the device, Kasa will advance to the "Joining your network" screen. If you do NOT see your network's name, tap on "Use a Different Network" at the bottom of the screen. Kasa will try to "guess" the correct network, which may or may not be yours. Scroll through the list of "Different Networks," and select your own. Kasa will return to the "Joining Your Network" screen, and your network name should now appear. Tap on the "password" field to enter your WiFi Network Password. Then tap "next."

Setup will progress to an "Almost Done" screen while it finishes configuring your device. After 2-3 minutes, the "Finished" screen should appear.

Voila! You're finished! You may now begin using your Smart Outlet. Keep reading to learn how to set up schedules and connect your devices to Alexa.
Using Your Smart Plug
Now your device is configured and connected, it's time to plug something in. Remember, you can always move your outlet and/or reassign its functions later. I recommend you play with it a little before scheduling it too much. However, if it's controlling a lamp, you may want to get to setting up routines and schedules right away. You can always disable, edit, or delete them later.
Accessing Your Devices
To access your devices, open the Kasa app, and tap "My Kasa."

This will bring you to the "Devices" tab, which will list all of your configured devices.

This screen is always accessible by tapping on the "plug" icon.
Tapping on the icon for an individual device will bring up the associated Device Information Screen. You'll need to access this screen any time you want to set a schedule or timer for an individual device. (See the next section for a screenshot.)
Viewing Usage Statistics
Usage statistics are available on each individual device information screen. If you have an energy monitoring plug, you'll find those stats here too.

To view weekly and monthly usage stats, tap on the "runtime hours," (7.4 in the screenshot.) You can also tap on the on/off icon to turn the outlet on or off, or to view its current state. (It glows green when the outlet is powered on.)

To view weekly and monthly usage stats, tap on the "runtime hours," (7.4 in the screenshot.) You can also tap on the on/off icon to turn the outlet on or off, or to view its current state. (It glows green when the outlet is powered on.)
Setting Schedules and Routines
To set up a schedule or routine for an outlet, you'll need to start at that device's information screen. (My Kasa...Devices...tap device icon.) At the bottom of that screen, you'll see "Schedule," "Away," and "Timer." Tap on the "Schedule" button to set up automatic on/off times for the outlet. You can also access the "Sunrise/Sunset" functions here.

Tapping "Schedule" will bring you to the "Schedules" tab. Any existing schedules for that device will be listed, along with an on/off switch to enable or disable each event.


Tapping "Schedule" will bring you to the "Schedules" tab. Any existing schedules for that device will be listed, along with an on/off switch to enable or disable each event.

Tap on the Plus (+) Icon in the upper right corner to create a new scheduled event. This will launch the "Create Event" screen.

On this screen, you will see "rolling numbers," an on/off button, and days of the week. Scroll through the numbers to set the time you want this event to trigger. Next, tap the on/off field to set whether this routine turns the outlet on or off. Finally, tap on the days of the week you want this event to trigger.
If you want the event to trigger at Sunrise, rather than a specified time, tap on the left arrow (<) character to the left of the time field.


Tapping on the caret (>) to the right of the time field will take you to the sunset function.

Once your routine is programmed to your liking, tap "Save." You will be brought back to the schedule tab, and you should see your new item listed there.
Follow the same steps to set an "off" time for your device. Note that you need to set up separate events for on and off.
Setting Up Away Mode
Setting up Away Mode follows similar steps. Start at the device information screen, and tap the "Away" button at the bottom.

This will bring you to the "Away Mode" screen. You'll note it looks very similar to the "Create Event" screen, except that "Away" mode has fields for BOTH on and off. (Remember, Away mode will randomly turn lights on and off during this interval.)

To access the "Sunrise" function, hit the arrow (<) to the left of the time field. To access the Sunset function, hit the arrow (>) to the right of the time fields, the same way we accessed them while creating an event.

When things are set as you like, hit the "Start" button. You will be brought to a screen that tells you Away Mode is running. To turn it off, hit the "Stop" button on that page. To leave it running, simply hit the back arrow to return to the Device Information screen. You can turn it off at any time by tapping "Away" on the device info screen. To restart it, tap on the "away" button, then hit "Start." You can edit its schedule from the Start screen, simply by tapping on the appropriate field.


This will bring you to the "Away Mode" screen. You'll note it looks very similar to the "Create Event" screen, except that "Away" mode has fields for BOTH on and off. (Remember, Away mode will randomly turn lights on and off during this interval.)


When things are set as you like, hit the "Start" button. You will be brought to a screen that tells you Away Mode is running. To turn it off, hit the "Stop" button on that page. To leave it running, simply hit the back arrow to return to the Device Information screen. You can turn it off at any time by tapping "Away" on the device info screen. To restart it, tap on the "away" button, then hit "Start." You can edit its schedule from the Start screen, simply by tapping on the appropriate field.
Setting Up Timers
Again, we're going to start from the Device Info Screen. Tap on "Timers" to start a timer. You will be brought to the "Timer" screen.

Tap on the numbers to set the countdown, then tap on the on/off to set the action. Then tap "start."
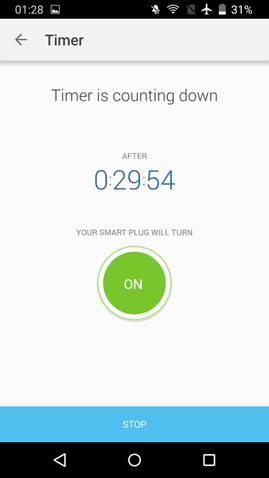
The timer will begin counting down. Tap stop at any time to cancel the timer. You can, of course, return to this screen from the Device Info screen by tapping on the "Timer" button.
Setting Up Scenes
TP-Link Smart Devices allow you to set up scenes as well. Scenes are similar to Alexa Groups. They allow you to create routines for one or more devices. Scenes also allow you to set up alternate Alexa commands. After running discovery, any scene created in the Kasa App will appear as a Scene in the Alexa app.
Because scenes can include more than one TP-Link device, you do not access them from the Device Info screen. Rather, you tap on "My Kasa," then tap on the "Sunrise" icon at the top of the screen.

This will bring you to the "Scenes" tab. Any configured scenes will be listed here, with an associated icon. Tap on the Plus (+) icon in the top right corner to set up a new Scene.

There are three "preset" scenes: Good Morning, which will turn on any selected devices at a set time, Good Night, which powers off selected devices at a set time, and Movie Time, that will dim any dimmable selected devices. Custom Scene lets you do whatever you want, so it's probably the choice you'll use the most.

The Scene creating process is a little convoluted. You tap on a pre-configured scene, select your devices (by checking boxes in the list,) choose an icon, then hit save. To configure the scene any further, including configuring device behavior(s), you'll need to go back and edit the scene.

Each "Scene" icon will have a small pencil icon in the upper right corner. Tap that icon to edit your Scene.

When the Edit screen opens, you'll see a "Scene Behavior" menu. Tap that to configure the behavior of devices in this scene. You can also delete a scene from its Edit screen. (You'll find a "Delete Scene" button at the bottom of this screen.)
Run device discovery after creating or editing a Scene. You'll need to to that to add or sync the scene with Alexa. Then, you can trigger the scene by saying "Alexa, turn on [name-of-scene]."
 Scenes are very similar to Alexa Groups in that they let you control multiple devices with a single command. However, Scenes only allow you to place Kasa Compatible TP-Link devices in a command-set; Alexa Groups allow you to put devices from ANY manufacturer into a single command-set. Scenes can be handy if you're running Smart Bulbs that can be dimmed or can change color, as you can set up these behaviors using scenes in the Kasa app, and later include them in an Alexa Group. But if you're only running Smart Outlets, you will probably find Alexa Groups more useful than Kasa Scenes.
Schedules apply to a single Smart Device. Scenes can include more than one device. That is the significant difference between a scene and a schedule. Either way, you use Kasa to automate your Smart Devices, and Alexa to control them at will. Scheduling offers a little more flexibility than scenes, and is probably the more useful function of the two.
Because scenes can include more than one TP-Link device, you do not access them from the Device Info screen. Rather, you tap on "My Kasa," then tap on the "Sunrise" icon at the top of the screen.

This will bring you to the "Scenes" tab. Any configured scenes will be listed here, with an associated icon. Tap on the Plus (+) icon in the top right corner to set up a new Scene.

There are three "preset" scenes: Good Morning, which will turn on any selected devices at a set time, Good Night, which powers off selected devices at a set time, and Movie Time, that will dim any dimmable selected devices. Custom Scene lets you do whatever you want, so it's probably the choice you'll use the most.

The Scene creating process is a little convoluted. You tap on a pre-configured scene, select your devices (by checking boxes in the list,) choose an icon, then hit save. To configure the scene any further, including configuring device behavior(s), you'll need to go back and edit the scene.

Each "Scene" icon will have a small pencil icon in the upper right corner. Tap that icon to edit your Scene.

When the Edit screen opens, you'll see a "Scene Behavior" menu. Tap that to configure the behavior of devices in this scene. You can also delete a scene from its Edit screen. (You'll find a "Delete Scene" button at the bottom of this screen.)
Run device discovery after creating or editing a Scene. You'll need to to that to add or sync the scene with Alexa. Then, you can trigger the scene by saying "Alexa, turn on [name-of-scene]."
Scenes vs Schedules vs Alexa Groups

Schedules apply to a single Smart Device. Scenes can include more than one device. That is the significant difference between a scene and a schedule. Either way, you use Kasa to automate your Smart Devices, and Alexa to control them at will. Scheduling offers a little more flexibility than scenes, and is probably the more useful function of the two.
Controlling Your Smart Outlets with Alexa

The easiest way to enable the Kasa Skill is to say "Alexa, enable the TP-Link Kasa" skill. Alexa should respond "Okay, I've enabled the TP-Link Kasa Skill." If she doesn't, you can enable the skill either through the Alexa app, or through the web at http://amzn.to/2wJJ2vP. (To enable through the Alexa app, open the Hamburger Menu and go to "Skills." Type "Kasa" in the Search Box. Select the Kasa Skill and tap "Enable skill.")
To run discovery, say "Alexa, find my devices." You can also run discovery from the Alexa app. Tap the Hamburger Menu, select "Smart Home," then tap "Devices." Scroll to the bottom and tap "Discover." Remember to run Discovery after adding or changing anything in the Kasa app.
Once you've done this, you can begin controlling your Smart Outlets by Device Name, Scene name, or Alexa Group. ("Alexa, turn on/off [device];" "Alexa, turn on/off [scene];" "Alexa, turn on/off [group]." "Alexa, turn [device] off" also works.)
Controlling your Smart Plugs with your SmartPhone
Controlling your TP-Link devices from your phone is easy. You should have become somewhat familiar with the Kasa app while configuring your Smart Devices and setting schedules. You can activate any individual device either from the "Devices" tab or from the device's Information Screen. You can run scenes from the "Scenes" screen (tap the sunrise icon) merely by tapping the scene name/icon. Kasa does not offer any geofencing options. Smartphone control is pretty much limited to turning devices on or off, activating (or turning off) Scenes, setting timers, and activating/disabling Away mode.
Summary

I have two "generic" SmartPlugs on order, and I am looking forward to seeing how the cheapies compare to the name brands. Yes, the "Direct from China" market has already started putting out copycat products. I have a feeling it will be in the app where the copycats fail to live up, but I may end up being pleasantly surprised after testing them out. Look forward to seeing the results in a future post.
 I am still learning the ins and the outs of the Harmony Hub, which is why the second part of "Controlling Your TV with Alexa" is delayed. I am also physically located in Southwest Florida, and am in the middle or Irmageddon right now. It is why this post's publication was delayed, and it will probably delay the next post in this series. Smart Homes aren't any good when you have no electricity or Internet. And so far, Alexa has not been incredibly helpful in providing Storm updates. Yes, she can tell me the weather, but she's said nothing about preparing to shelter in place or get the heck out. When I asked about traffic, all she could tell me was there was "unusual congestion," rather than "Every road going North is a parking lot and all the stations are out of gas." But I digress. Just be aware that this blog may not publish next week, due to weather conditions interfering.
But we will be continuing our Alexa journey in future posts. Again, if you have any devices or features you'd like us to cover, please let us know. And we'd love to hear feedback on today's post, as well as the series so far. Please hit us up in the comments, via g-mail (techlaurels at,) on Facebook (techlaurels,) or on Twitter (techlaurels.) As always, thanks for reading.
What's up, I read your blogs like every week. Your writing style is witty,
ReplyDeletekeep up the good work!
These switch boards are epic. Article covers a hot topic of home automation.
ReplyDeleteHeating and Cooling Toronto
Nice.. Thanks for sharing.
ReplyDeleteHome Automation