The Logitech Harmony Hub, Part 2:

Setting Up Your Harmony Hub and Adding Devices
This is Part 2 of a series examining the Logitech Harmony Hub. In Part 1, we reviewed the Hub itself, and we looked at what how the Harmony Hub can add voice control to your existing entertainment components, as well as Smartphone control. In Part 2, we look at configuring the device to work with your system components. In Part 3, we will look at adjusting your Harmony Routines to better control your own specific entertainment components.
By the time you've gone through Part 2, you'll have learned how to add devices to your Harmony Hub, as well as how to set up routines and activities for your various components. You'll also learn how to integrate your Hub and associated devices with Alexa. You will find many of your devices and routines work well, with no further tinkering.
However, once you begin voice controlling your components, you may find some are not working as expected. In Part 3, we'll talk about how to edit your devices and activities, so that everything functions smoothly. After using your Hub for a few days, you'll have a better idea of what needs tweaking.
Unboxing Your Harmony Hub
As we noted in Part 1, the Harmony Hub is available on its own, or packaged along with a Harmony Remote. Depending on which package you purchased, you should find the following items in your box:
- The Harmony Hub: This is a little black device, pictured in the header graphic along with an Amazon Dot. This is the part of the system that will communicate with your components and with Alexa.
- Power Adapter: This plugs into your Hub, and of course provides power to the device.
- IR Mini-Blaster: The IR mini blasters connect to the back of the hub and helps extend the coverage area for IR controlled devices. You'll need to use this if your entertainment system has closed cabinets and you have devices behind cabinet doors If you do NOT need to control anything behind closed doors, you will NOT need to use this piece.
- Universal Remote Control: Depending on the bundle, you may have a physical remote included in your box.
- Quick Start Guide: This pamphlet shows pictures of the various parts, and contains links to the sites you'll need to visit to set up and configure your hub.
- USB Cable: If you do not have a Smartphone, you'll need to physically connect your hub to a computer so you can link it to WiFi and update its configuration. It is MUCH EASIER to use a Smartphone or tablet, and you will NOT need this USB cable if you use a mobile device for setup.
With my own set-up, I needed neither the IR Mini Blaster nor the USB Cable.
First Steps, Pre-Setup:
Once you've unboxed your Harmony Hub, it's time to begin setting it up. Before you begin, there are several things you'll need to do.

- Find a Spot for your Hub: The first thing you'll need to do is find a spot to physically place your Hub. The Hub needs to be close to your Entertainment System, as well as an Alexa-enabled device. You'll also need a free outlet with which to power the Hub.
If you are not using the IR Mini Blaster, position the Hub on an open shelf, near your components. If you are using the IR Mini Blaster, plug it in to the back of the Hub, then place the Hub itself on a shelf near (or on top of) your components. Place the IR Mimi Blaster on top of your cabinet so that it may send IR signals to your television.
The Hub also needs to be placed where it can receive a good WiFi signal. If your equipment is in a "WiFi Dead Zone," the Hub will not be able to communicate with your router or your Echo. If you already have Smart Components, like a Smart TV, Roku, or Amazon Fire Stick, and these can access the WiFi signal, your Hub should likewise be able to access WiFi. - Plug in the Harmony Hub: Attach the Power Adapter to the back of the unit, then plug the other end into a power outlet. The Hub will take about 30 seconds to a minute to power up.
- Download the Harmony App: Before you begin setting up the Hub, you will need to download the appropriate app. Harmony is available at the Apple App Store and on Google Play. I also recommend downloading the PC Desktop App from Logitech.
If you have an older Apple device (iPhone 4, iPad 2 or iPod Touch 5 and earlier,) you'll need to use the Desktop App for initial setup, as the iPhone app is incompatible with these older phones. - Gather your WiFi Credentials: You will need your WiFi information to setup your Hub. Make sure you have your SSID (Network Name) and Password handy. If you are using a Smartphone for setup, (which I highly recommend,) ensure that phone is also connected to your Home WiFi.
- Enable Bluetooth: The Harmony Hub uses Bluetooth to communicate with your mobile device. Before beginning setup, ensure you have Bluetooth turned on in your Smartphone.
- Reboot Your Router: I ALWAYS recommend rebooting your modem and router BEFORE adding any new Smart Device to your network. It may not be necessary, but it never hurts, and by clearing its cache, your router becomes better at recognizing new devices.
- Gather your Equipment Information: During setup, the Harmony Hub will try to auto-detect your entertainment components. In my experience, it is better at auto-detecting newer devices and those already connected to the WiFi network. Older devices will need to be manually entered. This is much easier if you gather your make and model numbers BEFORE you begin actually setting up these devices. Often, the make and model number is located in small print, on the back of an entertainment component. It's also usually printed on the box and in the User Manual. (If worse comes to worst, try seeing if Amazon sells your component. If so, the model number will be included in the ite, description.)
It is MUCH EASIER to have a list of the components you want to control with your Hub when you begin the setup process. You will need this information later. I recommend that you take the time to gather this information so you do not need to interrupt set up to find a model number.
Once you have completed these steps, you are ready to begin configuring your Hub.
Configuring the Hub Itself and Adding Your Components

Again, before launching the app, ensure your Harmony Hub is powered on. Also ensure your Smartphone is connected to the same WiFi network as the Hub, and ensure Bluetooth is enabled. Location Services also need to be enabled during setup, so that the Harmony App can locate your devices and your Hub, and can correctly configure them.
After you have ensured your mobile device is prepped, you can open the Harmony App to begin setup. If you have an older cellphone you are planning on using as a Smart Home Remote, you may want to complete the setup process using this device.
Open the Harmony App:
You will be using the Harmony App to set up the Hub. So of course, the first step in setup involves opening the Harmony App itself. The app will walk you through setting up your Hub.

When the app opens, you will be presented with two choices: Set Up New Hub or Connect to Hub. Select "Set Up New Hub." You'll need to press the button on the top of your Hub to initiate setup. Then, the next couple of screens will help you connect your Hub to your WiFi network.

If you have used Harmony Remotes in the past, and already have a Harmony Account, click on the link to sign into an existing account. Otherwise, enter the required information to create your account. (If you are using the Desktop Version, it will ask you if you want to sign-in with Facebook or Google. I do NOT recommend this, as it will make switching between Smartphone and Desktop more difficult, and it will make it MUCH HARDER to integrate your Harmony account with Alexa. If you choose to log-in with a Social Media Account, you will ALWAYS need to log-in using this SAME account. If you lose access to that account, you will lose access to your Harmony Account as well. )
If you log in to an existing Harmony account, you will be presented with a screen asking you if you want to copy your old settings over to the new Hub. Unless you are migrating from an older hub to a new one, I'd suggest you select "Set up new." If you do not have an existing Harmony account, you should not see this screen. If you do, select "Set Up New," as you have no previous Harmony-configured devices to copy.

Once you have created your account, the Hub will present you with some informational screens, telling you about the Hub and what it can do. Then it will move on to actually discovering your devices.


Press "Add Device" to add any components your Hub did not auto detect. This will bring you to a screen asking what type of device you'd like to add: Entertainment Device, Home Control, Computer, or "Scan for WiFi."

We're adding our Entertainment Components to our Harmony Hub, so of course, we're going to select "Entertainment Device." Next, the app will move on to a screen where you may enter the make and model of the device.

This is where you'll refer to that list you made earlier, the one where you noted the make and model number of your devices. I am going to add my Toshiba Blu Ray Player, model BDX125OKU.

If you Harmony has any questions about the model, or if you made a typo, the app will present you with a list of choices. Select the correct model from this list.

The Harmony Hub will then add the device to your Hub. Next, it will attempt to power the device on.

Once the Hub has powered on the device, it will move on to the next screen, telling you you have successfully added the device, and asking you if you want to create an Activity for it. As we discussed in Part 1, Activities are equivalent to "Alexa Scenes," and allow you to tailor your voice commands.

We are going to tap "yes" here, and create an activity that will turn on BOTH the TV and the Blu-Ray Player with a single command.
After tapping "yes," you will be brought to a screen with a list of your configured devices, and checkboxes. You will need to check EACH device you want included in the activity. Since we're configuring our Blu-Ray Player, we are going to check BOTH the boxes for "Toshiba Blu-Ray Player" AND "Sony TV." Then we're going to press the right arrow (>) to continue.

If your components are not already powered on, you will need to turn them on. Then, press the "My Devices are On" button.

On the next screen, you'll need to select the correct input on your TV. Tap on the "TV" icon to bring up a list of inputs.

My Blu-Ray player is on "HDMI2," so I am going to tap on the radio button next to that to select it. Then I'll press the right arrow (>) to continue.

This will bring us back to the "Input Settings" screen. Press the right arrow (>) to continue. This will take you to the "Input Testing" screen. The app will ask you to actually use the component to see if it is working.

If your component is working, press the "Yes" button. (If it is not, press "no", and you will be given an opportunity to repeat the previous steps. If it still isn't working, we'll talk about how to adjust things in Part 3.)
This will bring you to the "Test" activity screen. You may choose to test your activity now or later. If you choose to test now, the app will attempt to power devices off, then back on. After doing so, it will ask you if the activity ran successfully. Select "Yes" or "No" accordingly.

Since my activity worked, I am going to select "Yes." (We will discuss troubleshooting and tweaking your setup in Part 3 of this series, in case your activity did NOT set up correctly.) The Hub will sync your changes, and the Activity you just created will appear in your "Activities" tab in the app.
You have now finished adding your first device, and setting up your first Harmony Hub Activity. You will need to add your other components in a similar fashion, as well as create activities for each. You may do so now, or you may do this later.

Tap on "Edit Devices," then on "+ Device."

This will take you to the "Add Device" screen. Follow the same steps we went through before, when setting up the first device, above to add your next component.


This will take you to the "Scenes" section in your Alexa app. At the top, you will see "Discover Scenes." Tap this button to run Scene Discovery and integrate your Harmony Activities with Alexa. (Your Harmony Activities will appear as "Scenes" in the Alexa app.)

Remember, if Alexa doesn't respond the way you want, try rephrasing your command. If Alexa consistently mishears a command, try dumping that activity into an Alexa Group.


Connect to WiFi:
The Harmony Hub will search until it locates available WiFi networks. Select your network from the list, then enter the WiFi Password in the appropriate field. If you have dual networks, make sure you select the 2.4 GHz network. Like most Smart Devices, the Harmony Hub is not yet compatible with 5 GHz networks. After your Hub connects to your WiFi network, it will move on to discovering devices.
If Harmony Hub isn't discovering or connecting to your home's Wi‑Fi, try the following:
- Ensure your WiFi password doesn't contain an emoji — they are not supported by Harmony.
- Unplug the hub from the power adapter, wait 10 seconds and then plug it back in. The Hub will take 30 seconds to power on.
- Power cycle your router by unplugging it from its power adapter, waiting 10 seconds and then plugging it back in.
- Move the hub closer to your router to eliminate range issues.
- Confirm you are connecting to a 2.4GHz, network, rather than a 5GHz network.
- If your router is not broadcasting its name or SSID, select Hidden Network from the Wi‑Fi screen and manually enter your information.
Create a Harmony Account
Once the Hub has successfully connected to WiFi, you are ready to start configuring it to work with your components. You will need to create a Logitech Account, so that the Harmony Hub can store your information on its servers and can communicate with your devices. The next screen will ask you to create an account.

If you have used Harmony Remotes in the past, and already have a Harmony Account, click on the link to sign into an existing account. Otherwise, enter the required information to create your account. (If you are using the Desktop Version, it will ask you if you want to sign-in with Facebook or Google. I do NOT recommend this, as it will make switching between Smartphone and Desktop more difficult, and it will make it MUCH HARDER to integrate your Harmony account with Alexa. If you choose to log-in with a Social Media Account, you will ALWAYS need to log-in using this SAME account. If you lose access to that account, you will lose access to your Harmony Account as well. )
If you log in to an existing Harmony account, you will be presented with a screen asking you if you want to copy your old settings over to the new Hub. Unless you are migrating from an older hub to a new one, I'd suggest you select "Set up new." If you do not have an existing Harmony account, you should not see this screen. If you do, select "Set Up New," as you have no previous Harmony-configured devices to copy.

Once you have created your account, the Hub will present you with some informational screens, telling you about the Hub and what it can do. Then it will move on to actually discovering your devices.
Add your Components to Harmony
The Harmony Hub will begin by trying to discover your devices on its own. It will present you with a list of WiFi enabled components it finds attached to the same WiFi network. If you have Smart Devices and/or streaming devices, the Harmony Hub should auto-detect them. In my case, it discovered 3 devices on its own: my Hue Lights, my Smart TV, and my Fire TV Stick.
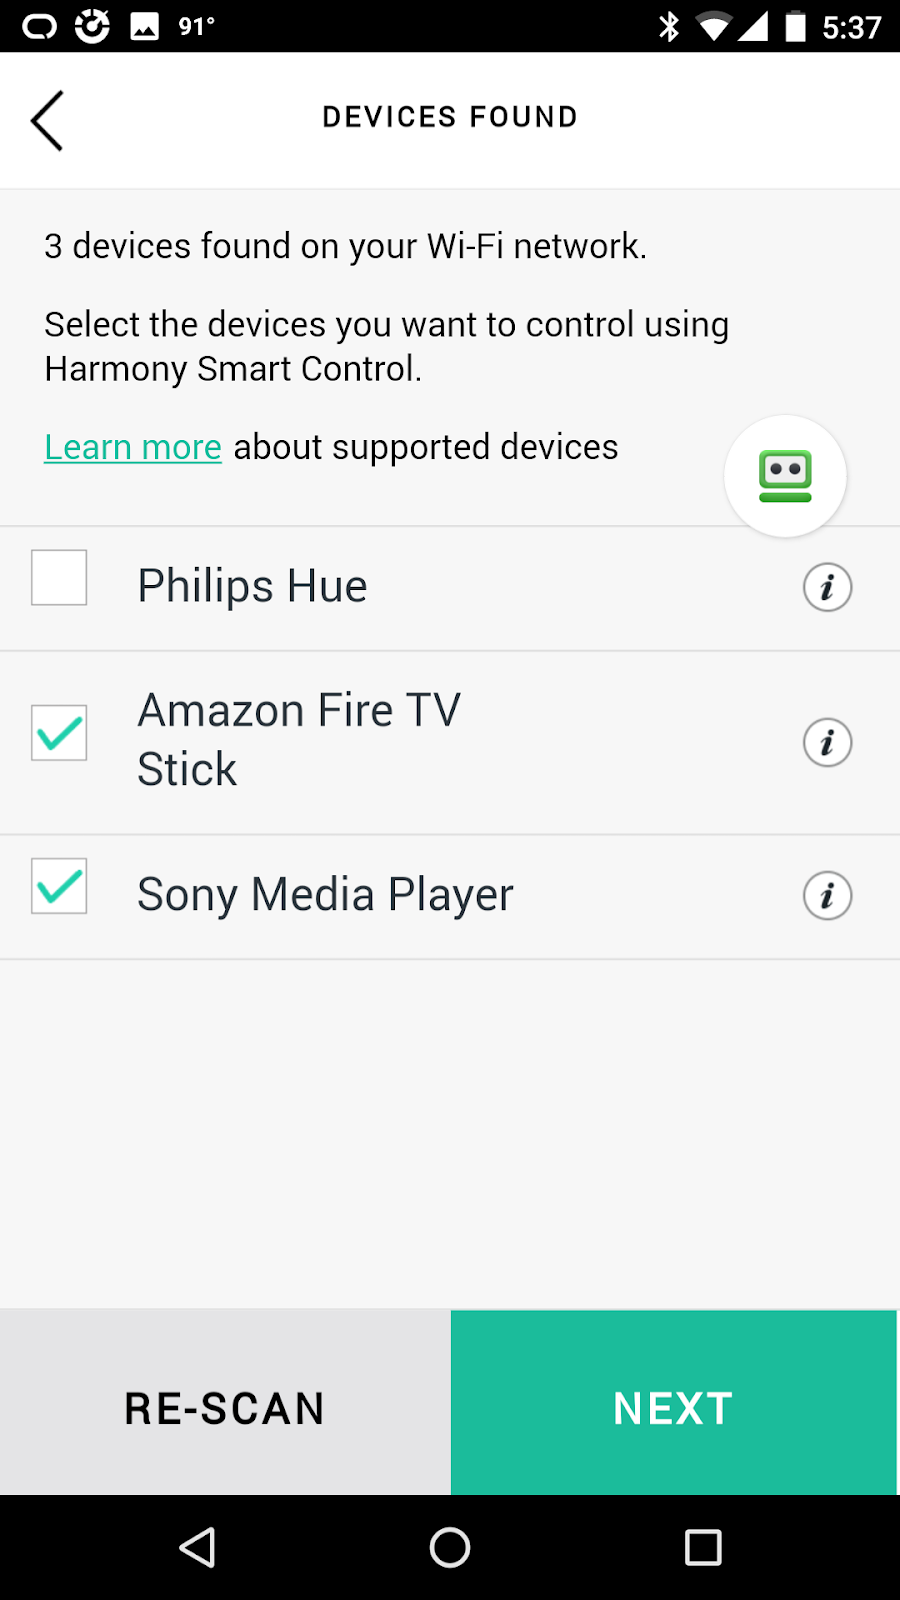
There will be a checkbox next to each device it discovers on your network. You will need to check the devices you want Harmony Hub to control, and uncheck those you do not. I already have my Hue Lights set up with Alexa, and I see no need to add them to my Universal Remote, so I unchecked the box next to "Philips Hue." "Sony Media Player" represents the "Smart" component of my very old Smart TV, so I kept that box checked. Likewise, I want to be able to switch to my Fire Stick via voice, so I want that added to the Harmony. The Harmony Hub also adds some voice capabilities to the Fire TV Stick that basic Alexa control does not. Even though you can control a Fire TV Stick via voice without a Harmony, I DO suggest adding it to the Hub.
After checking/unchecking boxes, press the "Next" button. This will take you to the "Devices" screen. Any devices already configured for Harmony Control will appear here. At the bottom of the screen, there is an "Add Device" button you will use to add the rest of your components.


We're adding our Entertainment Components to our Harmony Hub, so of course, we're going to select "Entertainment Device." Next, the app will move on to a screen where you may enter the make and model of the device.

This is where you'll refer to that list you made earlier, the one where you noted the make and model number of your devices. I am going to add my Toshiba Blu Ray Player, model BDX125OKU.

If you Harmony has any questions about the model, or if you made a typo, the app will present you with a list of choices. Select the correct model from this list.


Once the Hub has powered on the device, it will move on to the next screen, telling you you have successfully added the device, and asking you if you want to create an Activity for it. As we discussed in Part 1, Activities are equivalent to "Alexa Scenes," and allow you to tailor your voice commands.
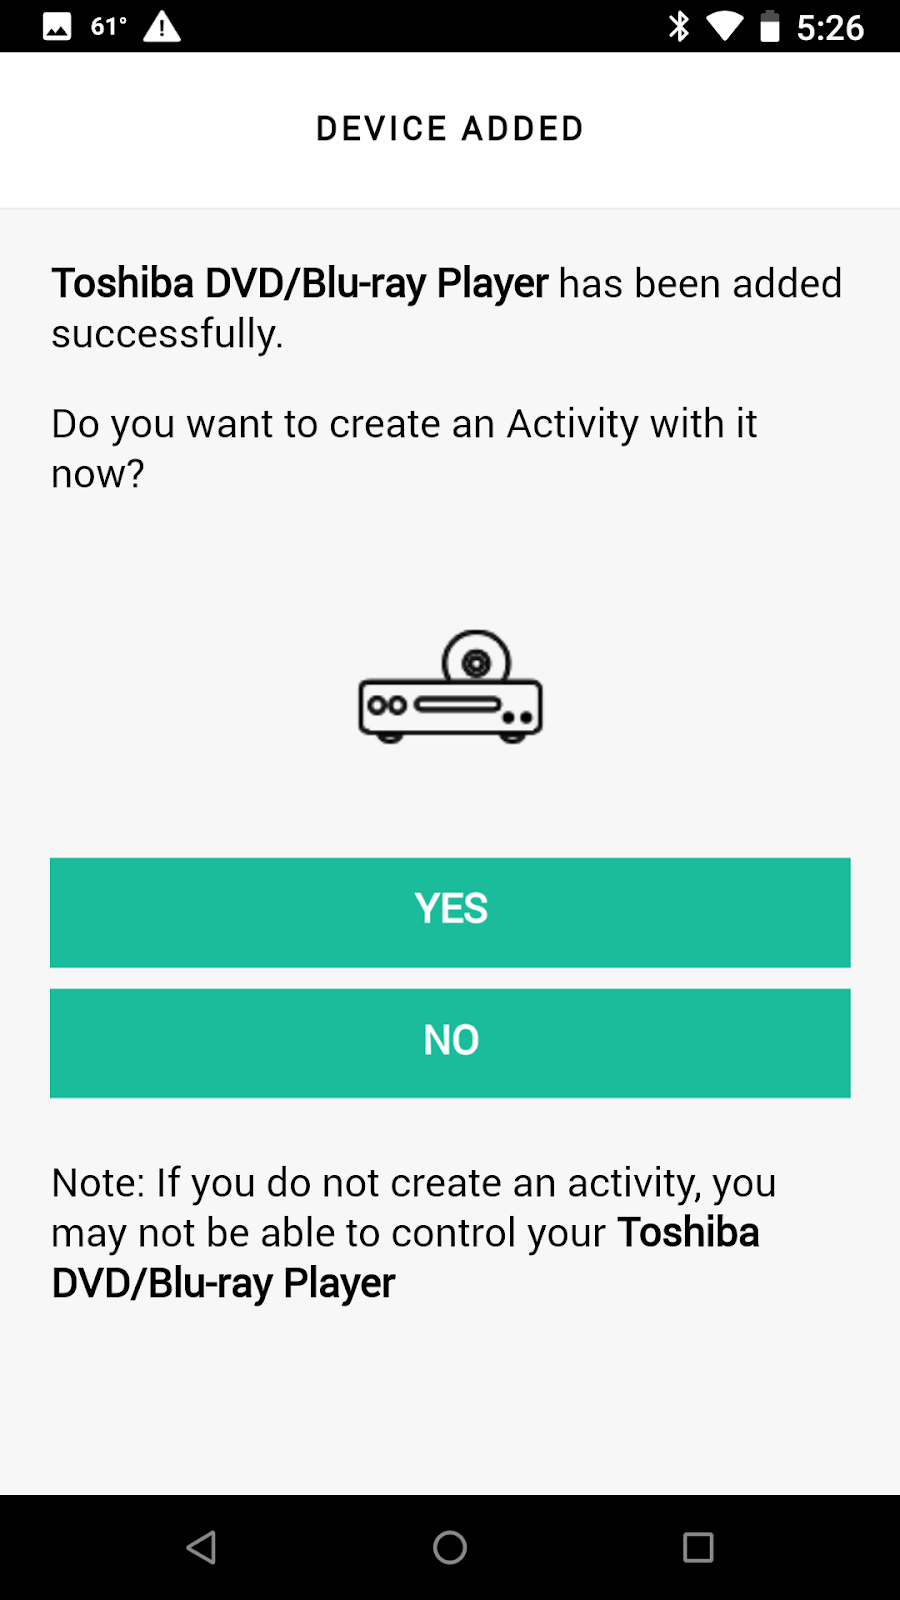
We are going to tap "yes" here, and create an activity that will turn on BOTH the TV and the Blu-Ray Player with a single command.
After tapping "yes," you will be brought to a screen with a list of your configured devices, and checkboxes. You will need to check EACH device you want included in the activity. Since we're configuring our Blu-Ray Player, we are going to check BOTH the boxes for "Toshiba Blu-Ray Player" AND "Sony TV." Then we're going to press the right arrow (>) to continue.

If your components are not already powered on, you will need to turn them on. Then, press the "My Devices are On" button.

On the next screen, you'll need to select the correct input on your TV. Tap on the "TV" icon to bring up a list of inputs.

My Blu-Ray player is on "HDMI2," so I am going to tap on the radio button next to that to select it. Then I'll press the right arrow (>) to continue.

This will bring us back to the "Input Settings" screen. Press the right arrow (>) to continue. This will take you to the "Input Testing" screen. The app will ask you to actually use the component to see if it is working.

If your component is working, press the "Yes" button. (If it is not, press "no", and you will be given an opportunity to repeat the previous steps. If it still isn't working, we'll talk about how to adjust things in Part 3.)
This will bring you to the "Test" activity screen. You may choose to test your activity now or later. If you choose to test now, the app will attempt to power devices off, then back on. After doing so, it will ask you if the activity ran successfully. Select "Yes" or "No" accordingly.

Since my activity worked, I am going to select "Yes." (We will discuss troubleshooting and tweaking your setup in Part 3 of this series, in case your activity did NOT set up correctly.) The Hub will sync your changes, and the Activity you just created will appear in your "Activities" tab in the app.
You have now finished adding your first device, and setting up your first Harmony Hub Activity. You will need to add your other components in a similar fashion, as well as create activities for each. You may do so now, or you may do this later.
Adding Additional Devices to your Harmony Hub
You will need to follow these steps for EACH device you want to add to your Harmony Hub. To add a new device after initial setup, open the Harmony App. Go to the "Devices" tab.

Tap on "Edit Devices," then on "+ Device."

This will take you to the "Add Device" screen. Follow the same steps we went through before, when setting up the first device, above to add your next component.

Integrating Alexa with Your Harmony Hub
Once you have added all of your devices, it's time to setup Alexa control. To do so, you must first enable the Harmony Skill and link your account to Alexa.
Before you link your Harmony Hub with Alexa, make sure you have set your Hub up, and that it is operating correctly. At minimum, you need to at least have set up your television set through the app. You may add your other Entertainment Components before Alexa integration or after. (Personally, I suggest you set up the components you use most often, and those you want to voice control first. This will prevent you from having to rerun discovery numerous times.) Your Alexa device (Echo, Dot, etc.) should also be set up and running.
Enable the Harmony Skill in Alexa
Once your Hub is set up and your devices have been added, open the Alexa App on your Smartphone, or navigate to the Alexa web portal. Open the Hamburger Menu and select "Skills."

Enter "Harmony" in the search box, then tap on the Harmony App in the search results.

Tap on "Enable Skill." You will be prompted to sign into your Harmony Account. Use the same credentials you used when you created your Harmony Account earlier.

During the account linking process, you will be given the opportunity to assign "friendly names" to each of your activities. Assign a one-word prompt you would like to use with Alexa voice control. For example, your "Watch Toshiba DVD" activity can be given a friendly name of "DVD." To edit these "friendly names" later, you will need to disable, then re-enable, the Harmony Skill from within the Alexa app. (This unlinks, then relinks your Harmony account.)
Once you have linked your accounts, you must run Device Discovery in Alexa. First, say "Alexa, discover my devices." This should link your Harmony Hub, along with its associated devices, to Alexa control. Then you need to run "scene discovery" to ensure all of your activities are properly integrated with Alexa, using their "friendly names."

After you link your accounts, tap on the "Settings" button on the Harmony Skill. Then tap on "Manage Smart Home Devices. (If you are using the Desktop Portal, click on "Manage Devices in Smart Home." )

This will take you to the "Scenes" section in your Alexa app. At the top, you will see "Discover Scenes." Tap this button to run Scene Discovery and integrate your Harmony Activities with Alexa. (Your Harmony Activities will appear as "Scenes" in the Alexa app.)

After enabling the Harmony Skill, linking your account, and running Device Discovery, you should be able to voice control your TV with Alexa. If you make changes to any Activity names, you will need to unlink and relink your accounts to update the Alexa app. After unlinking and relinking, you will need to rerun discovery.
Harmony Voice Commands
You will find Harmony and Alexa can be very quirky when it comes to HOW you need to issue a command. Certain commands are already reserved within the Alexa lexicon. If you have a Fire TV installed, and you use the word "watch," Alexa will assume you want to watch something in the Amazon Video Library. Instead, try saying "Start [name of activity]." or "Turn on [name of activity]."
Harmony controls things using the activity name, rather than using the name of the device. You may put Harmony Activities into Alexa Groups for easier voice control, and to assign alternate command prompts. However, in order to use voice control, you must assign your Harmony-attached devices to either a Group or to an Activity, (or both.)
For example, when I set up my Blu-Ray player, I created an activity called "Watch a blu-ray." I gave this activity a "friendly name" of blueray. Now, I can say "Turn on blueray," and Alexa runs my activity, which turns on my TV and Blu-Ray player, and sets the input to HDMI 2. Alexa does not recognize the individual devices listed on your Harmony app's "Devices" tab; she ONLY recognizes Harmony Activities. Thus, you will want to set up an activity and give it a friendly name in order to grant Alexa control to your individual components. Your Harmony Activities will all show up as "Scenes" in your Alexa app.
When I set up my Magnavox DVD/DVR, I assigned it to an activity called "Watch DVR." This turns on my TV and the component, switches the TV to the correct input, switches the component to the DVR mode, and fires up the recordings menu. A second activity, called Watch DVD, sets this component to DVD mode. Alexa confuses DVD and DVR a lot, especially over the noise of the TV, so I created a group called "Magnavox," and a group called "Disc." The Magnavox Group contains a single activity: watch DVR. The Disc group also contains a single activity: watch DVD. But now, I can say "Alexa, turn on Magnavox" to initiate my "Watch DVR" activity, or "Alexa, turn on disc" to initiate "Watch DVD." You may likewise want to place poorly named activities into better-named Groups.
If you have a external speakers you only want fired up when you're watching a Blu-Ray, you can create a group called "Sound Enhance" that will run your "watch Blu-Ray Movie" and "Run External Speakers" activity, just by placing these two activities in the same Alexa Group. Similarly, I created a group called "Movie Mode" that fires up my "watch a blu-ray" activity AND dims my nearby Hue Lights. Alexa groups allow you to put devices from different manufacturers into a single group, which is handy for things like my Movie Mode. Assigning activities to groups can be easier than trying to edit activity names. You can also include "scenes" set up by different apps (like Hue and Harmony) to the same Alexa Group. Groups can be a powerful tool in helping you fine tune your voice commands.
Sometimes Alexa seems to forget she is controlling the TV and not herself. To compensate for this, you may need to append the name of the device to your command so that Alexa understands. For example, "Alexa volume up" will adjust the volume on your Echo itself. If you want Alexa to adjust the volume on your TV, try saying "Alexa, volume up on TV."
For example, here are some commands phrased in a way Alexa will understand:
- "Alexa, turn on the TV"
- "Alexa, turn on ESPN"
- "Alexa, change channel to 29"
- "Alexa, turn up the volume on TV"
- "Alexa, start Blu-ray"
- "Alexa, rewind DVD"
- "Alexa, pause Netflix"
- "Alexa, turn off the TV"
Remember, if Alexa doesn't respond the way you want, try rephrasing your command. If Alexa consistently mishears a command, try dumping that activity into an Alexa Group.
Using Your Harmony Hub
If you have gotten this far, you have already set up your Hub, added several components, and linked your Harmony Account with your Alexa account. You have a basic understanding of activities, Alexa scenes, and voice command protocol. Now it's time to start using your Harmony Hub.

You now have a choice of how you control your Entertainment Devices. You may voice control them using Alexa, you may use the Smartphone App, or you may use the original remote that came with the component. Especially when it comes to DVDs and DVRs, you may find it easier to perform some functions using either the Smartphone App or the original remote.
Start off by issuing simple commands, like "Alexa, turn on DVD," or "Alexa, change TV to channel 43." If a command does not work, try saying it another way. Again, sometimes it helps to append the name of the device to your voice command.
Every collection of devices will work together differently. As you start using your Harmony Hub, begin jotting down notes as to what is not working correctly. Is your TV not changing inputs correctly? Do you need to add some delays between steps in Harmony routines? Is Alexa confusing similar sounding commands? Few setups work right out of the box, and most will need some tweaking to run the way you want. We will discuss editing routines so that they work correctly in Part 3 of this series. By the time that is published, you may have a list of things you need to tweak.
If you find you are having specific issues, and you want some specific suggestions, reach out to us on Facebook, Twitter, or in the Comments Section of this blog. We will try to help you address your issues, and you may even find them featured in this blog.
Summary
This is the second part of a series on The Harmony Hub, Alexa, and adding voice control to existing Entertainment Devices. Part 1 gave an overview of the Harmony Hub. Part 2 looked at setting up the Hub itself, as well as adding your devices and integrating them with Alexa. Part 3 will look at tweaking your Harmony routines so that they better control your specific set of Entertainment Components.

The Harmony Hub is a fantastic device, once you get it set up properly. But it does have somewhat of a learning curve, and it does require a lot of adjusting to get it working just the way you want. If you are not very tech savvy, you may want to engage your Computer Guru to help you set up and tweak your Hub and associated devices. This will most likely involve two sessions: one to get the Hub and your devices set up, and a second a week or so later to tweak your configuration.
Once you have your Harmony Hub set up and running, you may find it easier to use a traditional remote for certain functions. For example, I'd never try to set up my DVR completely by voice. I usually use either the Smartphone App or my original remote when I am setting up my DVR for the upcoming week. But for turning your components on and off, playing and pausing, adjusting the volume, and changing channels, voice control works extremely well. I love being able to navigate the Amazon Video Library via voice, as well as launch Hulu and other SmartTV apps.
I find the Hub especially helpful when I'm watching TV while cooking. It's nice to be able to change the channel while hands deep in raw meat, without having to worry about washing my hands first. It's nice to be able to ask Alexa to turn up the volume on my TV so I can hear it over the microwave or mixer. It's nice to be able to rewind or pause if I miss something while I'm forming those hamburger patties, again without having to stop to clean my hands. It also keeps my nephew's sticky hands off of my remotes when he is snacking while watching my TV. And even if the Hub does not mean complete hands-off control, the Smartphone app integrates all my separate remotes in one place. And the voice control is especially convenient when my hands are otherwise engaged.
Although setup can be difficult, once you have everything configured correctly, you are good to go. If you can get through the somewhat frustrating tweaking process, you will be good to go until you need to add or replace components. I emphasize this because a lot of folks dismiss the device out of hand when the initial setup does not go as planned, instead of noting what parts are not working and going back to adjust those.
Do you have a Harmony Hub? How do you use it? Did your components take a lot of adjusting before they worked smoothly? Or are you here because you need to know how to make the Hub work better for you than it already is? (If so, stay tuned for Part 3; it will probably contain the information you seek.) We'd love to hear your feedback on the Harmony Hub and how it works with Alexa. Hit us up in the comments an let us know your thoughts.
As always, thanks for reading. We hope you will stay tuned for Part 3. And remember, although it may sound complex, the Harmony Hub really is easy to use, once you learn its idiosyncrasies. Before you know it, you'll be voice controlling your own Entertainment Components with ease.
I am regular reader, how are you everybody? This paragraph posted
ReplyDeleteat this website is truly fastidious.