Set Your Android Phone to Backup to Google
Protect Your Contact Lists and Photos
Almost every day, I see someone post something to this effect on Facebook: "I got a new phone and lost all my numbers. Please message me yours." And I always reply "Just retrieve your contacts from your Google account." This is one of the most powerful features of Android: it backs almost everything up to Google, so long as you turn sync on.
 I cannot tell you how many times an SD card has crapped out with all my mobile photos on it. I never worry though. I just log into my Google Photos account and there they are. And when I get a new phone, I just log in to my Google account on it, and I get all of my stuff back. Yes, my contacts, calendar, apps, etc. are all restored with a couple of taps.
Now, in order to effectively use an android phone, you NEED to have a google account. They are free, and Google allows you to have more than one. And you may set up more than one Google account on an android device. (I have 2 on my phone.) If you already have a GMail account, you can just use that. If not, you will need to set one up. (And, yes, you can do this right on your smartphone.)
This post will walk you through setting up sync on a new android. If you already have an android phone, follow the steps to ensure you have things set up correctly. Things may be located in different places according to your version of Android. But fortunately, it is similar for all. You just may need to explore menus a little to find the appropriate submenu. This routine also applies to Android Tablets. (Most anything that is not an iPhone or iPad is Android based, with the exception of Fire Tablets.)
Set Up Your Google Account on your Phone
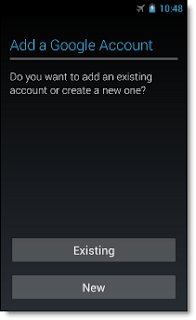
 When you first turn on a new phone, you will be prompted to set up your Google Account. Again, you can use one you already have, or you can create a new one.
1. Go to Settings, then to accounts.
2. Press "Add Account"
3. Select "Google", then "Next." (You may be asked to enter a PIN or Password to proceed.)
4. If you have an existing Google Account (name@gmail.com,) sign into it. If you want to create a new account, select "More Options," then "Create Account." (Follow the prompts and enter the appropriate information to create a new Google Account.)
Your Google Account should now appear under the "Accounts" submenu.
(Depending on your Android version, your screen may look like the one on the left or the one above.)
Set up Sync
Once your Google Account is associated with your device, you can set up sync.
1. Go to "settings" then "Accounts."
2. Tap on your "Google" account. This will bring up an accounts submenu. Tap on the Google Account to which you want to backup. (This should be the one you just finished setting up, of course. 😉)
3. This will bring up a sync submenu, consisting of a list of items and checkboxes or sliders, depending on your Android Version. You should see checkboxes/sliders for
4. Either check the checkbox or tap the sliders to turn them green to back up the associated item to your Google Account. Make sure Contacts. Photos, and Calendar are selected at the very least. Personally, I turn almost all of the backup categories on.
Set Up Backup
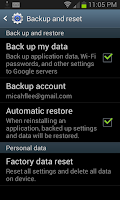
 After you set up sync, you really should turn on backup. This will allow you to restore your phone easily when you need to get a new one.
1. Go to "settings" then "Backup and Sync."
2. Tap on "backup my data" and ensure it is set to "on."
3. Check to see the CORRECT GMail account is listed under "Backup Account."
Now your phone will back up to Google.
Set Up Data Saver
 Data Saver is a feature available on later versions of Android and is useful for those who have limited data plans. If you have unlimited data, you do not need to turn this on.
1. Go to "Settings," then "Data Usage."
2. Tap Data Saver. Move the slider to "on."
How to Use Your Backup
 Android makes it easy to restore a full backup when you get a new phone. What will happen is the device will walk you through adding your Google Account when you first turn it on. Make sure you sign on to your new phone with the GMail account you previously used for backup. Google will ask you if you want to restore your information during the setup process. You will be presented with a list of devices. Choose your previous phone from this list then tap on "Restore." This will restore EVERYTHING you had backed up from your old device, including your contacts and photos.
If you do not want to restore everything, hit the little down arrow next to the "Restore all X Apps" prompt. You'll be brought to a submenu with checkboxes and sliders. Check only the items you want brought over to the new phone.
How to Restore Contacts on your Current Phone
If for some reason, your Contacts get borked on your current phone, you can restore them from Google.
1 Go to "Settings," then "Google."
2.Tap "Restore Contacts." Then tap on the GMail account from which you want the contacts restored.
 How to Access Synced Photos on a PC
Since your photos are now being automatically backed up to your Google Account, it's now easy to access them on a PC or other device. Simply open a browser (Chrome or Firefox on most Android devices, although it may be listed generically as "Internet,") and navigate to Google. On a PC, you'll see a series of boxes in the upper right corner, Click on that, then click on Photos. If you are on a tablet or phone, you may have a "Photos" app that will take you directly to your Google Photos account. (It should have the same "Pinwheel icon" as shown in the graphic.)
Migrating From Apple iPhone to Android?
Google makes it easy to migrate from Iphone to Android, using Google Drive. Basically, you download Google Drive on your iPhone and/or iPad. Then you backup all the "stuff" you want to move to your Google account. (For more information, see the Google Help Pages.) Alternatively, you can export information using iTunes/iCloud, and import it into your Google account. Frankly, it's easier to go from ios to Android than the other way, but either can be done fairly easily. (If you're local to the SRQ Area, Techlaurels can provide you with onsite migration assistance. Contact us for details.)
Now Go and Back Up!
Now you know exactly what you need to do to ensure you do not lose your valuable contacts and photos, even if you lose or break your phone. Now, depending on your version of Android and the "fluffware" your manufacturer installs, you may have a choice when creating a contact of whether it's a Google Contact or not. Choose "Google Contact" to ensure these contacts sync correctly with Google.
Remember, one of the advantages to using Android is the fact all of your information backs up to the Cloud. Yes, these settings should be enabled by default, but they are not always. So grab your phone and go make sure sync and backup are turned on!
Need Help?
If you have questions specific to your personal device or Android version, hit me up in the Comments below, and I'll do my best to answer them.


No comments:
Post a Comment
Thank you for contributing to the discussion! Your feedback is valued! (Unless you are a sunglasses or work at home spammer, in which case, your comment will be promptly deleted. :D) The Mods are reviewing it, to keep those types away! ;)